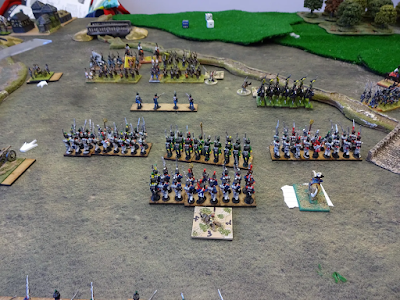
The Battle of St Martin, in Austria took place on 29th April 1809. An Austrian rear guard action where the Austrians were slightly outnumbered but held the high ground and terrain which would force the French poorly trained division of Claparede to stay in column for longer than desired.
The Scenario is from "The Roads to Vienna, 1809" from Michael Hopper, and again a very challenging game for both sides. Game length is 12 turns, We played 10 turns before a result and club night finished. In Combat Purple and White (with red pips) are the "stats/modifed" unit score and the other dice Blue and White Dice are the random rolls!
We diced to see if the stream was fordable, and it was. The River was only crossable at the bridges.
I took charge of the French consisting of 14 poor battalions and 2 average and a foot gun, Mike controlled the Austrian forces of 1 large poor battalion, 3 average large battalions, 4 average battalion, 3 light horse regiments and a heavy foot gun. All figures from Mike's collection which, he is still building, hence unfinished bases.
Deployment:
AUSTRIAN
FRENCH 
Turn 1 & 2, involved getting orders to units and getting them advancing.
Turn 3: The Austrian Heavy Artillery proved it's worth, causing damage on the French Columns most turns, which forced them into line and slowed their advance!
The Austrians move down from the high ground to join up with the brigade of Radetzky.
While the French columns advanced around the central wood.
Turn 4: The artillery strikes again! The French move up their artillery.

Turn 5: The Austrian Uhlans Charge the infantry of Coehorn
The poor battalion is broken, not only by the 3 kills, but by the cavalry winning as I elected to fire and not try and form Hasty Square.
With the reverse result in the center, with the Uhlan unit Broken, with 5 kills (only takes 4)
Turn 6: and another French unit take the full force of the heavy gun and is Broken. The Brigade is on a morale test in the Command phase, which they pass.
Turn 7: The French artillery is starting to cause casualties in the Austrian ranks as the French are getting closer, but the threat of the Uhlans still lingers.
Turn 8: The Brigade of Lesure move up in support of Coehorn:
The French Right flank have manage to get across the stream and are getting their formations aligned. Musketry causing some casualties.
Turn 9: Yes, you guessed it, the Uhlans charged again and breaking another poor unit in combat. Another morale test, as this loss takes the Brigade to 50% losses
The French right desperately charge the Austrian left to try and force the line! (Pic a bit bluured)
In the Command phase, Coehorn failed morale and the Brigade became "Staggered" -1 to their Frontal Morale Rating.
Turn 10: Coehorn charged (I think he could not, but could not find in rules and time was against us), and Lesuire moved toward his objective of St Martin!
Melee on the French right, saw one broken unit and an Austrian unit get pushed back, and losing 2 casualties.
And on the left, two more broken units in Coehorn's brigade!


This broke the Brigade and end the game, as I only had 2 turns to destroy the Austrians (no where near this happening), and to take St Martin (still 3 or 4moves away). The Austrians gain a slender victory, but weight of numbers of the Austrian bigger units would have taken the day we think. Well done Mike!
_4uqHALj9ZBeeCtbHD7W2B6.JPG?width=960&height=720&fit=bounds)
_xbbxy2PN2GFnpwj5HrvuHn.JPG?width=590&height=370&fit=bounds)
_2VUAuankfJCgHy17sZAGC9.JPG?width=960&height=720&fit=bounds)
_jphJa1jPVh4Vwwi6u4AybU.JPG?width=960&height=720&fit=bounds)
_nSezL3WXnEkYKKfZyjFvxT.JPG?width=960&height=720&fit=bounds)
_ehqsJX9gzqknSFTcPGb7vW.JPG?width=590&height=370&fit=bounds)
_57piBZ1ojcQ8mMh3MmBQEc.JPG?width=590&height=370&fit=bounds)
_2khKScJfT34bRs2cbYGddT.JPG?width=590&height=370&fit=bounds)
_gaEYJXsq7ZF8x5ubn1YQEC.JPG?width=590&height=370&fit=bounds)
_uvmYkdgJLEaVN7vJasoJt4.JPG?width=590&height=370&fit=bounds)
_4CSLXnXUL3wxP5J7sCEpaD.JPG?width=590&height=370&fit=bounds)
_jp1jG1MozaGAeu3J6nnykN.JPG?width=590&height=370&fit=bounds)
_jR3r3srEwueQm5aEVsLjVQ.JPG?width=590&height=370&fit=bounds)
_2iKPmM3GKKhAd1KxHjcDya.JPG?width=590&height=370&fit=bounds)
_ifENyeGYrqPKqCdcWshnHb.JPG?width=960&height=720&fit=bounds)
_oQZb86Zi88LPx8TEcTjrYZ.JPG?width=960&height=720&fit=bounds)
_6bR5DLj15aL4LgfruTBd19.JPG?width=960&height=720&fit=bounds)
_hLavEGzrD8b1ruQoSoxy8h.JPG?width=960&height=720&fit=bounds)
_thMjVnLrxUrwngv8emUELK.JPG?width=960&height=720&fit=bounds)
_gSL3cUfiNVkzk5UCKN4zJ1.JPG?width=960&height=720&fit=bounds)
_385kC1CnmPgE2341NTFnek.JPG?width=960&height=720&fit=bounds)
_6FEUau9vKyYrHxYVVJreD7.JPG?width=960&height=720&fit=bounds)
_kkcMxbdB55ub9KbV6rqji9.JPG?width=960&height=720&fit=bounds)
_vH3v776jCw2owaYwgxCWKN.JPG?width=960&height=720&fit=bounds)
_nZT7GbNjPLnDBNWg8Q5CEE.JPG?width=960&height=720&fit=bounds)
_841rzjrqRkrdsz2aXr2nBW.JPG?width=960&height=720&fit=bounds)
_qXHNNd8CSVpPqykPT7LrEn.JPG?width=960&height=720&fit=bounds)
_8kZpGwtCGys121WxKxCN2X.JPG?width=960&height=720&fit=bounds)
_bk8vmDcxZsEnrcbDjJbRvC.JPG?width=960&height=720&fit=bounds)
_82mVMMFKFyY6YvaXjpgfoV.JPG?width=960&height=720&fit=bounds)
_wNpTfGN7sXgkFD4z9QfLkQ.JPG?width=960&height=720&fit=bounds)
_dNydQefjkiWh8kikQX4N2f.JPG?width=960&height=720&fit=bounds)
_fVGguGSiRovQhQwPKRB9Wq.JPG?width=960&height=720&fit=bounds)
_4gmWgXzhFs5y8f1F6WKTRk.JPG?width=960&height=720&fit=bounds)
_3zVCuo6gXEhtks5x46hdzF.JPG?width=960&height=720&fit=bounds)
_3BZc9EhHdMzsSeFAdwDesW.JPG?width=960&height=720&fit=bounds)
_5rqNVfDH7cKT4y3RRU9rm1.JPG?width=960&height=720&fit=bounds)
_irHHWdAdXJ7Cq3WSHGuqY2.JPG?width=960&height=720&fit=bounds)
_9YrZNLQUxfFbB5gBnzoz75.JPG?width=960&height=720&fit=bounds)
_9ZVLqaXQmjBAV61tyqBAED.JPG?width=960&height=720&fit=bounds)
_sfGKjSegfTZxmNzZQjuYCG.JPG?width=960&height=720&fit=bounds)
_m65xagbTGzmM4X41R7oo9x.JPG?width=960&height=720&fit=bounds)